
HTTP Basic Configuration
HTTP Basic authentication provides the fewest setup requirements, requiring only one outside tool
that you are likely already familiar with: the htpasswd utility. This command line utility is
generally delivered as part of an Apache web server installation. If
this tool is not present on your system, there are a number of web based tools that will also
produce a valid htpasswd file; google for "htpasswd generator" for a selection.
The first thing to do, before anything else, is to create an htpasswd file that contains at least
one username and password.
It is important that the
htpasswdfile exists before configuration, as having a path to a non-existent file in the configuration could break the Apigility installation.
A good place to store this file would be in data/users.htpasswd.
$ htpasswd -cs data/users.htpasswd ralph
New password:
Re-type new password:
Adding password for user ralph
$
Once the file has been created, its path can be used to configure the required htpasswd file input
of the HTTP Basic authentication configuration adapter. Go to the "Authentication" page, and click
the "New adapter" button, you will see something like that:
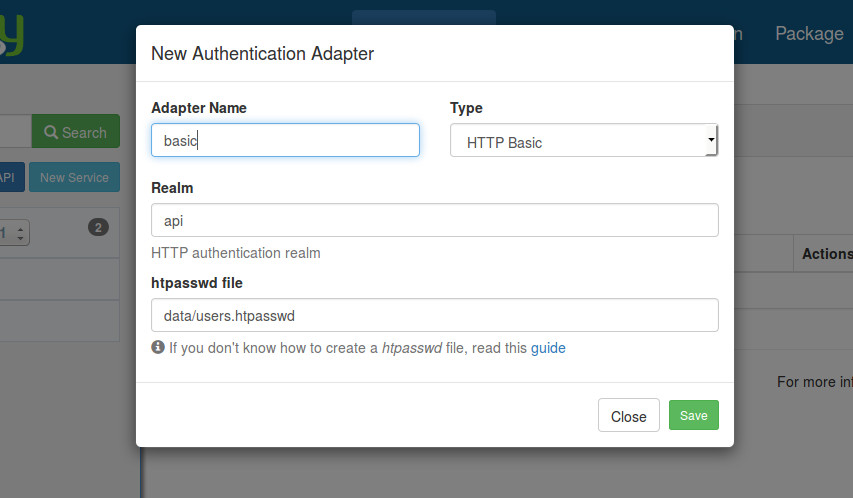
You need to specify an authentication adapter name, select the HTTP Basic type, provide a realm value
and the path of the htpasswd file.
Of the configuration entered into this screen, the generated configuration is stored in config/autoload/local.php
file. This file is not intended for check-in into your version control system and should be excluded
via .gitignore. The intended purpose is to ensure that if an authentication scheme was on your local
development system, when pushed into production, the system will still be configured to look for
authentication even if a user/password store is not available in your VCS. At this point, your
production system should get a non-VCS user/password htpasswd file to ensure proper authentication
of identities with HTTP Basic is possible.
// config/autoload/local.php
return [
    'zf-mvc-auth' => [
        'authentication' => [
            'adapters' => [
                'basic' => [
                    'adapter' => 'ZF\\MvcAuth\\Authentication\\HttpAdapter',
                    'options' => [
                        'accept_schemes' => [
                            0 => 'basic',
                        ),
                        'realm' => 'api',
                        'htpasswd' => 'data/users.htpasswd',
                    ],
                ],
            ],
        ],
    ],
];
It is important to note that local.php configuration is generally intended to be duplicated to a
deployment environment, but with different configuration for usernames, passwords, etc. The above
example detailing basic adapter configuration via local.php is unusual as it is equally valid for
deployment.
At this point, HTTP Basic authentication with the previously entered username and password is ready to use. A successfully authenticated identity will allow the user to access the given API:
GET /foo HTTP/1.1
Accept: application/json
Authorization: Basic cmFscGg6cmFscGg=
HTTP/1.1 200 OK
Content-Type: application/json

{
    "foo": "bar"
}
An incorrect username or password should result in an 401 Unauthorized attempt:
GET /foo HTTP/1.1
Accept: application/json
Authorization: Basic #invalid-token#
HTTP/1.1 401 Unauthorized
Content-Type: application/problem+json

{
    "type": "http://www.w3c.org/Protocols/rfc2616/rfc2616-sec10.html",
    "title": "Unauthorized",
    "status": 401,
    "detail": "Unauthorized"
}
Important Notes
- Your client should be capable of properly encoding the HTTP Basic
Authorizationheader. - In production, ensure an
htpasswdfile can be utilized in the same relative location as in development, even if thehtpasswdwas not checked into your VCS. - Omitting the
Authorizationheader implies that the "guest"ZF\MvcAuth\Identity\GuestIdentityidentity will be used.