
Creating a REST Service
In this chapter, we'll create a simple REST service.
Assumptions
This chapter assumes you have read and followed both the installation guide and the getting started chapter. If you have not, please do before continuing.
You will need to install and configure the zfcampus/statuslib-example module in order to perform
this tutorial. Follow these steps:
Step 1
Within your application root, execute the following:
$ composer require zfcampus/statuslib-example
You will be prompted as to whether or not you wish to inject the module into configuration; you do, and you should inject it into config/modules.config.php.
Manual registration
If you do not get prompted to inject the module, or accept the default, which does not inject, you will need to add the entry
'StatusLib'toconfig/modules.config.php.
Step 2
Create a PHP file data/statuslib.php that returns an array:
<?php
return [];
Make sure the file is writable by the web server user.
Step 3
Edit the file config/autoload/local.php to add the following configuration:
return [
    /* ... */
    'statuslib' => [
        'array_mapper_path' => 'data/statuslib.php',
    ],
];
Step 4
Finally, you will need a valid HTTP basic credentials file, usually titled htpasswd. You can
generate one using the standard htpasswd tool provided by
Apache, or use an online htpasswd
generator. Store the htpasswd file as
data/htpasswd in your application. Make a note of the credentials you use so that you can use them
later.
Once those steps are complete, continue with the tutorial.
Terminology
Within the Apigility documentation, and, in particular, this chapter, uses the following terminology:
- Entity
- An addressable item being returned. Entities are distinguished by a unique identifier present in the URI.
- Collection
- A addressable set of entities. Typically, all entities contained in the collection are of the same type, and share the same base URI as the collection.
- Resource
- An object that receives the incoming request data, determines whether a collection or entity was identified in the URI, and determines what operation to perform.
- Relational Links
- A URI to a resource that has the described relation. Relational links allow you to describe relations between different entities and collections, as well as directly link to them so that the web service client can perform operations on those relations. These are also sometimes called hypermedia links.
REST services return entities and collections, and provide hypermedia links between related entities and collections. Resource objects coordinate operations, and return entities and collections.
Create a REST Service
In this chapter, we're going to build a sample REST service.
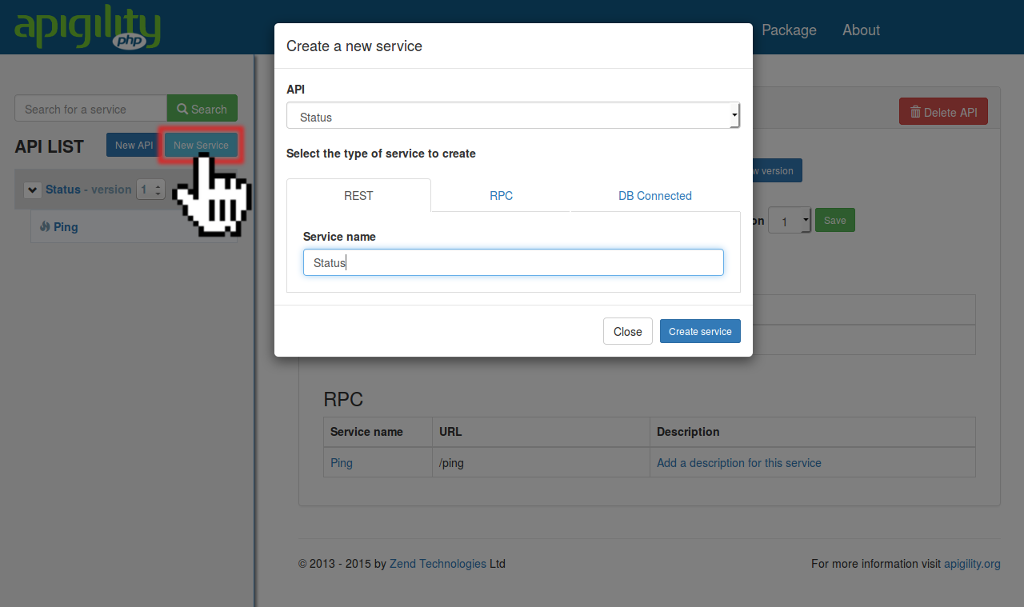
In the sidebar, click the "New Service" button. The REST tab is selected by default; provide the value "Status" for the "Service name" field and press the "Create service" button.
REST vs DB-Connected services
When you create a REST service, Apigility creates a stub "Resource" class that defines all the various operations available in the service. These operations return
405 Method Not Allowedresponses until you fill them in with your own code. That means you need to supply the code that performs the actual work of your API; Apigility provides the wiring for exposing that code as an API.DB-Connected services are also REST services. They allow you to specify a database adapter, and then to choose one or more tables to expose as services. Apigility then creates "virtual" Resources which delegate operations to underlying Zend\Db\TableGateway\TableGateway instances. In other words, DB-Connected is more of a rapid application development (RAD) or prototyping tool.
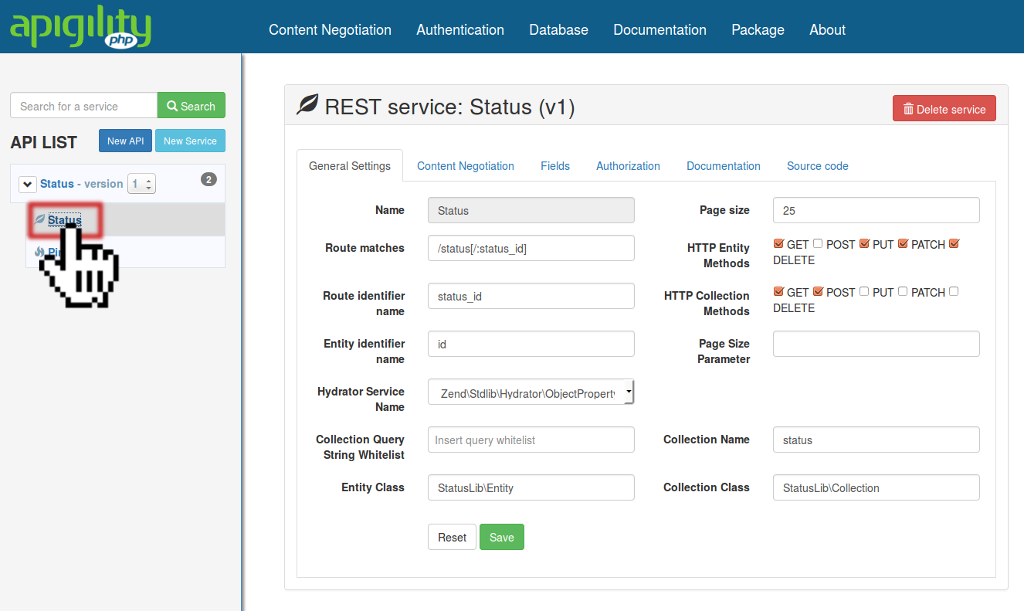
Once the service has been successfully created, the "Status" page will show up.
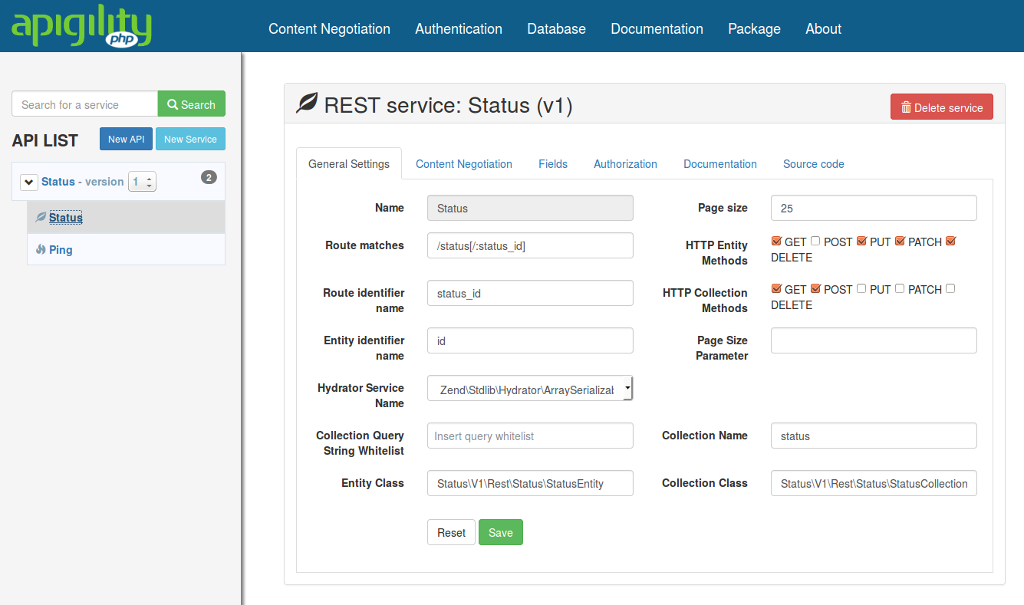
Apigility provides a number of sane defaults:
- Collections only allow
GET(fetch a list) andPOST(create a new entity) operations. - Entities allow
GET(fetch an entity),PUT(replace the entity),PATCH(perform a partial update), andDELETE(remove the entity) operations. - If your collection supports pagination, Apigility will limit to 25 items per "page" of results.
- Apigility creates a routing URI based on the service name (e.g.,
/status[/:status_id]).
URI Routing
Apigility runs on top of a Zend Framework MVC stack, and thus uses its routing engine.
The routes generated by Apigility are all what are known as "Segment" routes. Segment routes allow you to:
- Specify optional portions of the URI, using
[ ]syntax.- Specify named parameters to match using
:varNameor:var_namesyntax.- Specify literal matches; anything not a named parameter, or within braces (
{ }) is considered a literal.For REST services, the URI generated has a literal, mandatory match that, when specified by itself, resolves to a collection; in the example above, this would be the path
/status. It also has an optional segment with a named parameter, what we call the "entity identifer":[/:status_id]. This will match URIs such as/status/foo,/status/2,/status/96fa5ac9-3ae2-45b2-84d5-c346936be292.One note: the
/between the collection URI and the entity URI can only be specified when specifying an entity; you cannot request the collection with a trailing slash.Why? Because one tenet of REST is one URI, one resource. If we allowed a trailing slash, we'd be allowing multiple URIs to resolve to the same resource.
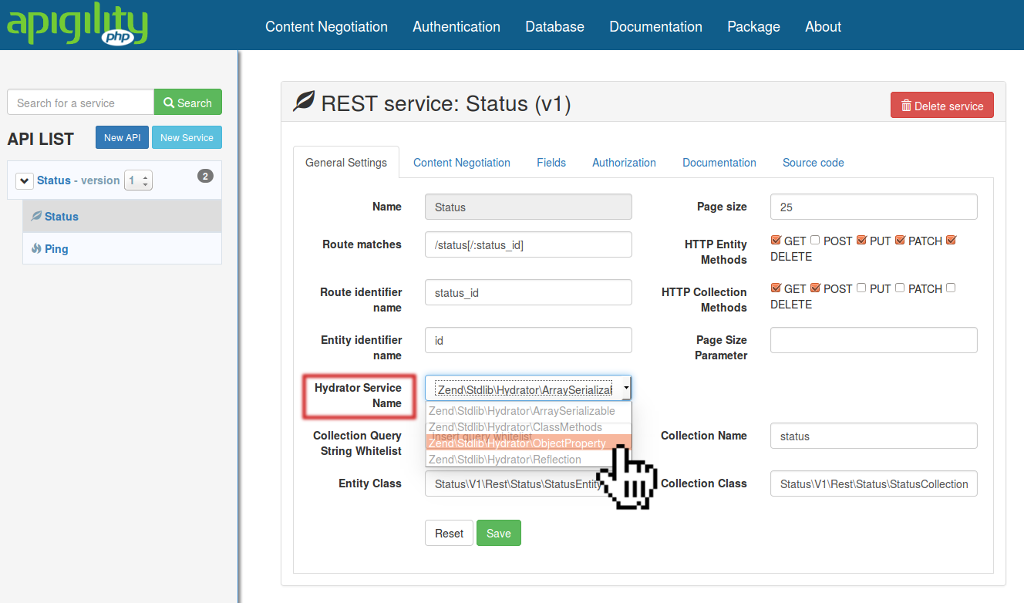
In the REST service page, you'll see a field named "Hydrator Service Name" with a value
of Zend\Hydrator\ArraySerializable. We're going to change this to work with our StatusLib
example library. For the "Hydrator Service Name", select the value
Zend\Hydrator\ObjectProperty.
Hydrators
Hydrators are objects that allow for casting an associative array to a specific object type and vice versa. Each hydrator employs a different strategy for how this is done. The default hydrator type that Apigility uses is the
ArraySerializabletype, which expects an object to implement two methods:
getArrayCopy()for extracting an array representationexchangeArray($array)for casting an array to the object(These are the same methods used in PHP's
ArrayObject!)The
ObjectPropertyhydrator will extract any public properties of an object when creating an array representation, and populate public properties of the object from an arraywhen casting to an object.
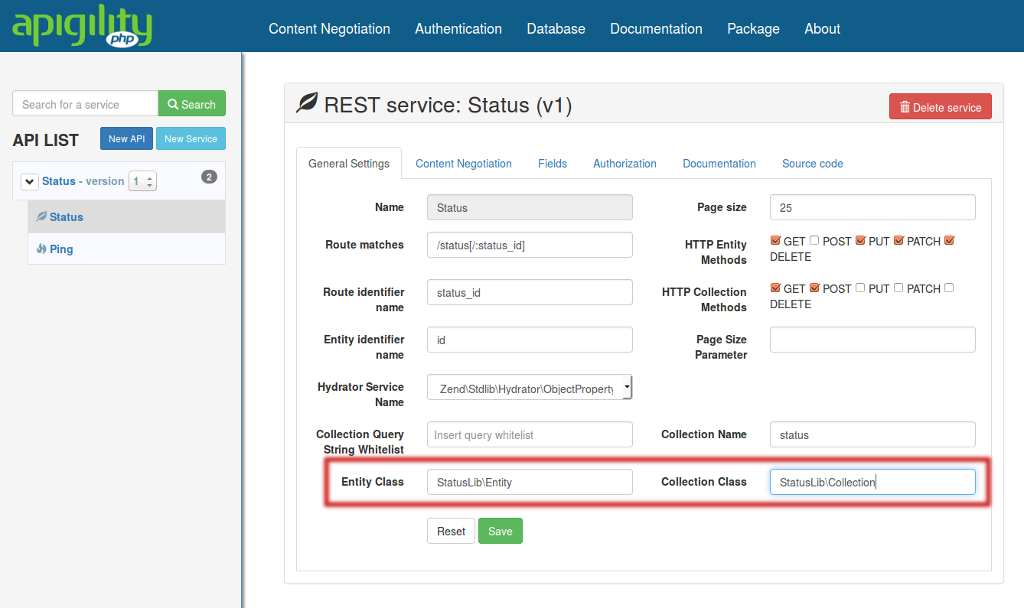
For our example, the StatusLib library provides its own Entity and Collection classes. Edit the
"Entity Class" field to read StatusLib\Entity and the "Collection Class" field to read
StatusLib\Collection. Finally click the "Save" button at the bottom of the screen.
Service Classes
When you create a Code-Connected service, Apigility generates four PHP class files for you:
- An Entity class
- A Collection class which extends
Zend\Paginator\Paginator, which will allow you to provide paginated result sets.- A Resource class for performing operations.
- A Factory class for the Resource created.
Your own code may already define entity and collection classes that you want to use, so you are free to ignore the stub classes Apigility creates. One note, however: if you end up versioning your API, you may find that having version-specific entity and collection classes can be useful, as they can allow you to model only the properties you wish to expose for each specific version.
Next, let's define some fields, and document our API.
Define fields for our service
The fields we'll define are:
-
message- a status message. It must be non-empty, and no more than 140 characters. -
user- the user providing the status message. It must be non-empty, and fulfill a regular expression. -
timestamp- an integer timestamp. It does not need to be submitted, but if it is, must consist of only digits. It will always be returned in representations.
We'll also have an id field, but this will only be for purposes of display.
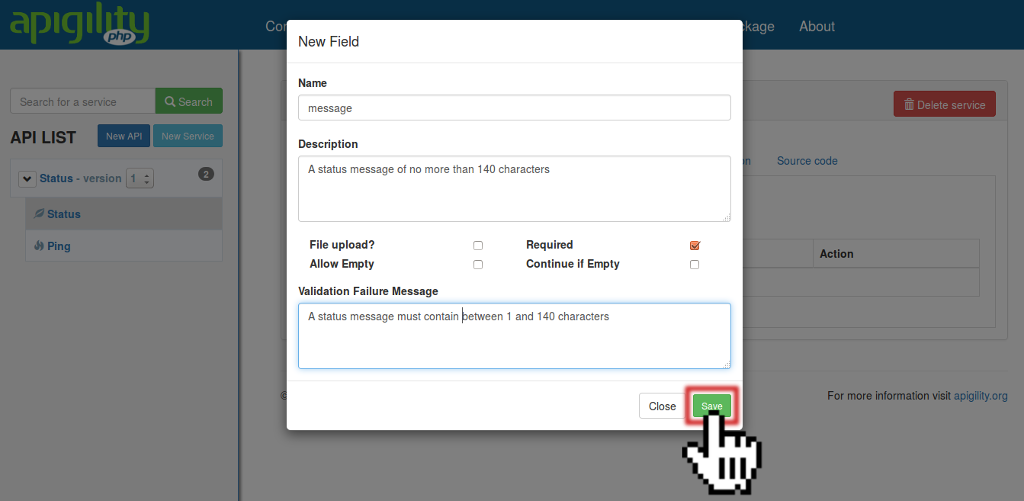
Navigate to the "Fields" tab, and click the "New field" button. In the text input titled "Name", type the word "message"; for the "Description", enter "A status message of no more than 140 characters", and for the "Validation Failure Message," enter "A status message must contain between 1 and 140 characters". Finally press the "Save" button to create the new field.
Repeat the procedure to create the fields "user" and "timestamp", without descriptions or failure messages.
Following the best practices of "Filter Input, Escape Output", we want to create a filter for the "message" field. Click the + (plus) icon in the Filter column for the "message" field.
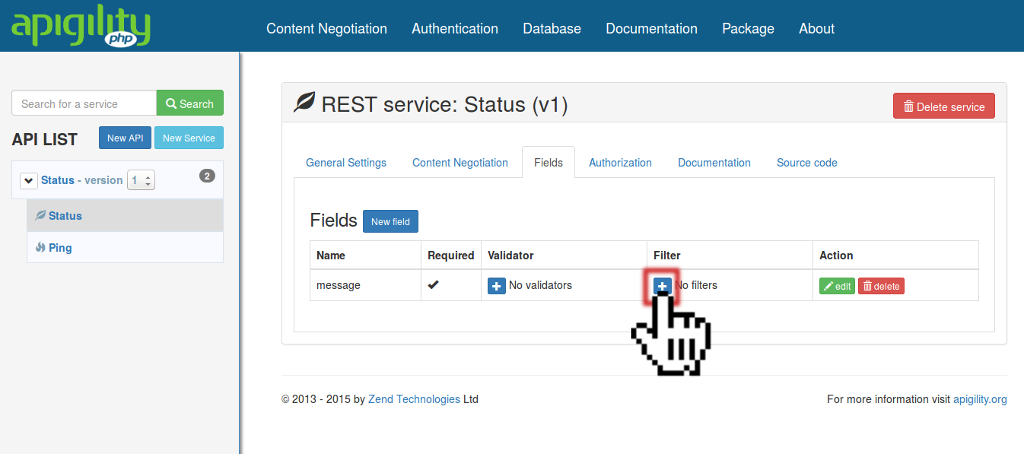
Select Zend\Filter\StringTrim in the "Filter" drop-down list, and click the "Save" button.
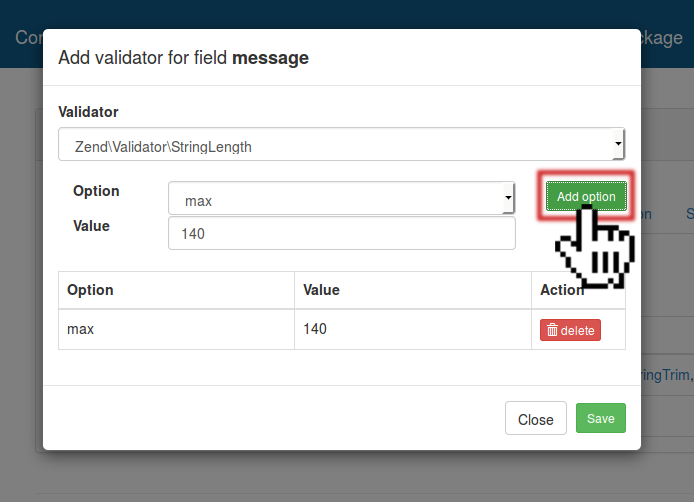
We want also to add a validator for the "message" field. Click the "+" (plus) icon in the "Validator"
colum. In the modal window, select Zend\Validator\StringLength as "Validator", and select the
max option for the "Option". Insert the value 140 for the max option and click on the "Add option"
button; you will see the option appear in the table below.
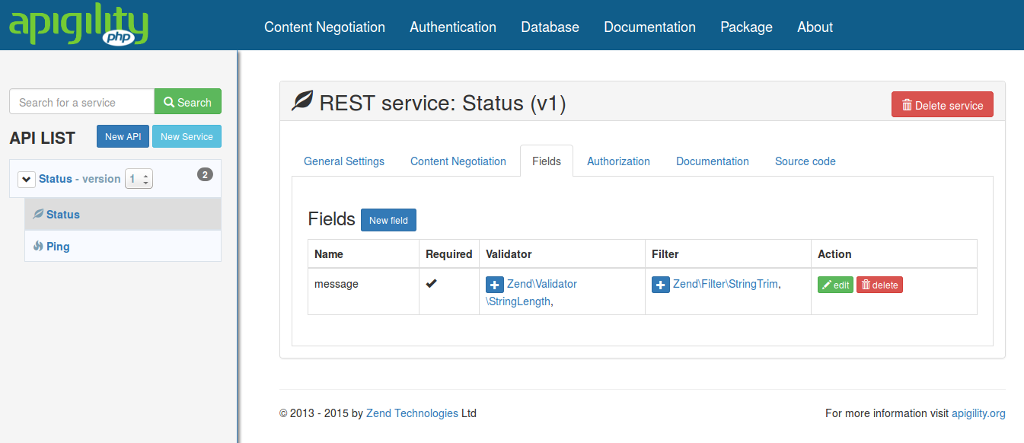
Now you can click on the "Save" button to save the configuration; you should see the following on your screen:
At this point, perform the following:
- Edit the "user" field:
- Add a description of "The user submitting the status message."
- Add a validation failure message of "You must provide a valid user."
- Add a
Zend\Filter\StringTrimfilter. - Add a
Zend\Validator\Regexvalidator; give it apatternoption, with the value/^(mwop|andi|zeev)$/(feel free to substitute or add other names or nicknames as desired).
- Update the "timestamp" field:
- Add a description of "The timestamp when the status message was last modified."
- Add a validation failure message of "You must provide a timestamp."
- Toggle the "Required" flag to read "No."
- Add a
Zend\Validator\Digitsvalidator.
Below is a screenshot detailing what the "Fields" tab will look like on completion.
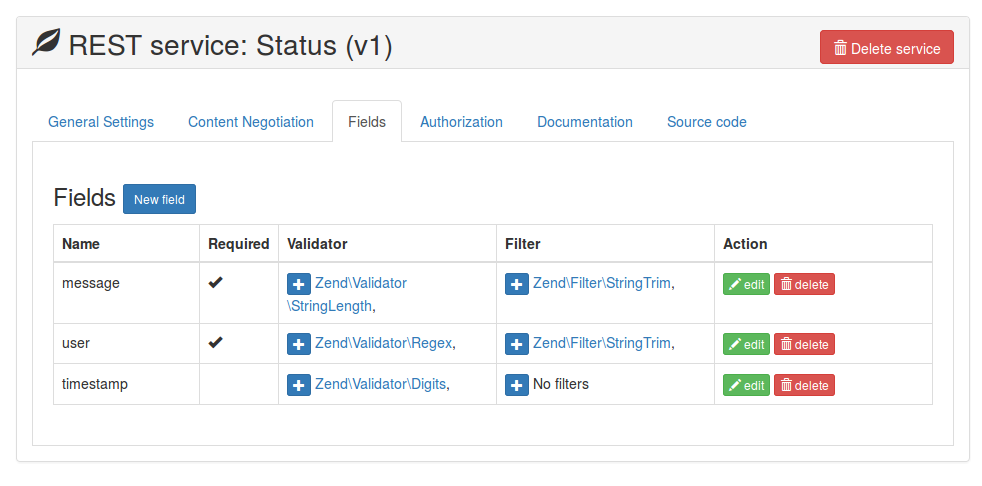
Let's move on to documentation.
Documentation
REST services allow you to document not only by HTTP method, but by HTTP method for each of Collections and Entities.
The procedure for documenting a REST service is just like we learned in the Getting Started chapter, with only one difference:
- You will need to document HTTP methods for both collections and entities.
Your exercise now is to document both collection and entity operations:
- Give the service a description of "Create, manipulate, and retrieve status messages."
- Give collections a description of "Manipulate lists of status messages."
- For the
GETmethod, describe it as "Retrieve a paginated list of status messages." - For the
POSTmethod, describe it as "Create a new status messages."
- For the
- Give entities a description of "Manipulate and retrieve individual status messages."
- For the
GETmethod, describe it as "Retrieve a status message." - For the
PATCHmethod, describe it as "Update a status message." - For the
PUTmethod, describe it as "Replace a status message." - For the
DELETEmethod, describe it as "Delete a status message."
- For the
We'll examine the documentation later. For now, let's move on to authentication and authorization.
Authentication and Authorization
Apigility can manage both authentication and authorization. Starting with version 1.1,
you can specify an authentication adapter for each API. For each service, you can indicate
which HTTP methods to put under authentication. Marking methods and services as needing
authorization means that they are inaccessible unless a user provides valid credentials to the API.
If you were to try and perform the operations we just marked at this time, you'll find that you
cannot perform them; you'll get a 403 Forbidden response!
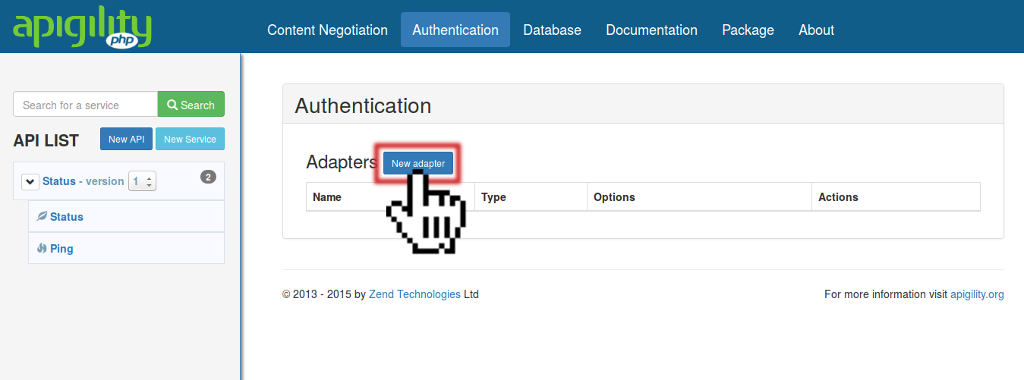
To configure authentication, we need to create a new authentication adapter. Select the "Authentication" menu item to bring up the authentication page. You can choose from HTTP Basic, HTTP Digest, or OAuth2.
For this example, we are going to use HTTP Basic.
- Click the "New Adapter" button
- Insert the value "status" for the "Adapter Name"
- "HTTP Basic" should be already chosen as "Type"
- Fill in "api" for the "Realm" setting
- Fill in "data/htpasswd" for the "htpasswd Location".
- Click the "Save" button when done.
After that, we need to tell our "Status" API to use this new adapter. Click on the "Status" name in the tree view of the sidebar.
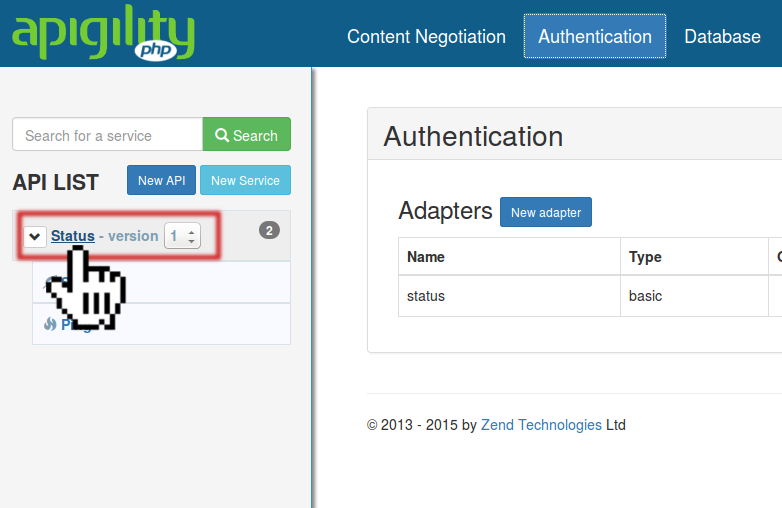
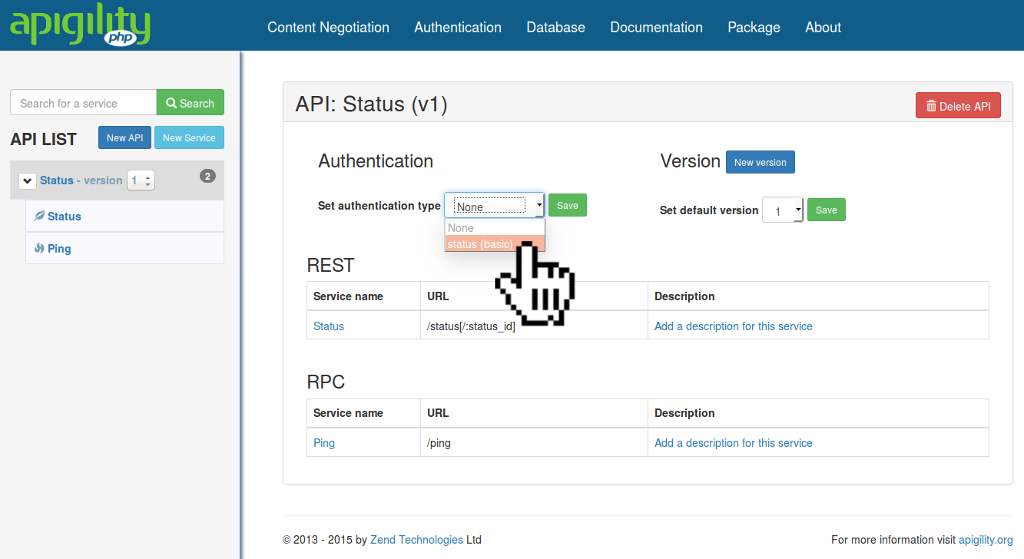
This action will open the dashboard page for the "Status" API. In this page you will see a list of the REST and RPC services, the versioning information (our default is version 1), and the authentication section — where we can select the authentication adapter to use for the API.
We can select the value "status (basic)" for the "Set authentication type"; click the "Save" button when done.
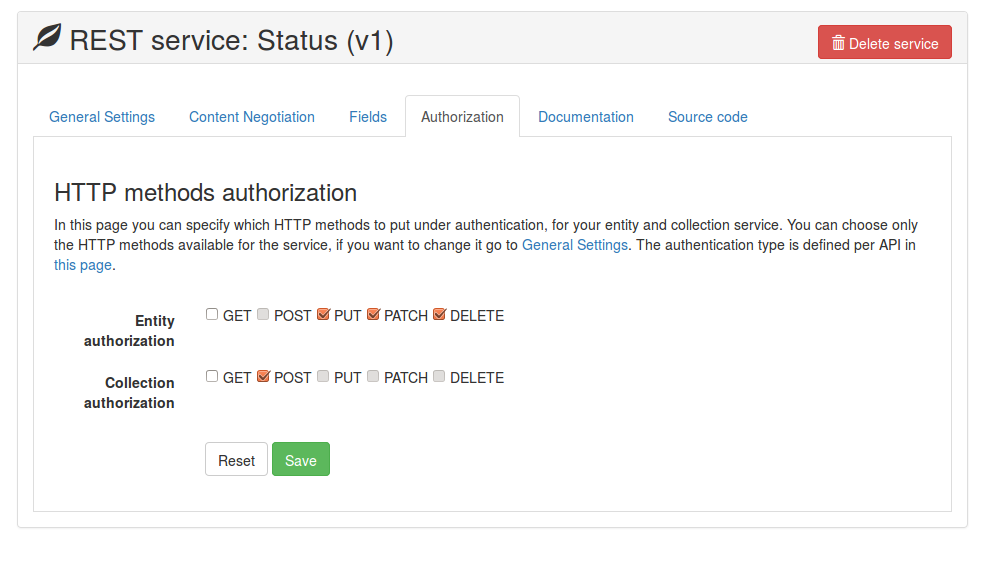
The last part of the authentication configuration is to choose which service and HTTP methods to put under authentication. We need to open the "Status" REST page by click the "Status" service name in the sidebar. You will see a page like that.
In the "Authorization" tab of the "Status" REST page we can choose which HTTP methods will require
authentication. Check the boxes marked POST, PATCH, PUT, and DELETE in order to indicate
that any service exposing these operations will require authorization. You will notice that some of
the HTTP methods are disabled, because they are not available as HTTP methods for the service (if you
want, you can enable these in the "General Settings" tab). Then click the green "Save" button.
Defining the resource
You may recollect from earlier that Apigility creates four class stubs for us, one each for the entity, collection, resource, and a factory for initializing the resource. It's time to put some code in our resource class so it can do something.
Apigility provides versioning out-of-the-box. One aspect of versioning is that code is also versioned by namespace. This feature allows you to run multiple versions of your API in parallel.
Our resource class will be found in
module/Status/src/V1/Rest/Status/StatusResource.php. Open that file in an editor.
The first change we'll make is to import the StatusLib\MapperInterface class.
Add the line use StatusLib\MapperInterface; above the existing use statements.
use StatusLib\MapperInterface;
use ZF\ApiProblem\ApiProblem;
use ZF\Rest\AbstractResourceListener;
Next, we'll create a class property $mapper, with protected visibility:
class StatusResource extends AbstractResourceListener
{
    protected $mapper;
Create a constructor that accepts a MapperInterface, and assigns it to our $mapper property:
    protected $mapper;

    public function __construct(MapperInterface $mapper)
    {
        $this->mapper = $mapper;
    }
Now that we have our mapper composed, let's fill in some methods.
- Replace the body of the
create()method withreturn $this->mapper->create($data);. - Replace the body of the
delete()method withreturn $this->mapper->delete($id);. - Replace the body of the
fetch()method withreturn $this->mapper->fetch($id);. - Replace the body of the
fetchAll()method withreturn $this->mapper->fetchAll();. - Replace the body of the
patch()method withreturn $this->mapper->update($id, $data);. - Replace the body of the
update()method withreturn $this->mapper->update($id, $data);.
You'll notice that we're not updating all methods in the class. Several methods are for operating on lists, and we are not defining those operations.
How will we get the $mapper into the resource? For that, we'll edit our factory. Open
the file module/Status/src/V1/Rest/Status/StatusResourceFactory.php in an editor,
and modify it so it reads as follows (you should only need to change the return line inside the
__invoke() method):
<?php
namespace Status\V1\Rest\Status;

use StatusLib\Mapper;

class StatusResourceFactory
{
    public function __invoke($services)
    {
        return new StatusResource($services->get(Mapper::class));
    }
}
The above is a factory for use with the Zend Framework Service
Manager. When your
service is selected in a request, this factory will be run in order to create an instance of your
StatusResource. In this method, we're pulling another service already defined in the StatusLib
module, and injecting it into our StatusResource.
At this point, we finally have a working REST service!
Let's perform some tests to see how it works.
Testing it out
The first test will be a GET request to the collection.
GET /status HTTP/1.1
Accept: application/json
We haven't added any status messages yet, so we get an empty collection in response.
HTTP/1.1 200 OK
Content-Type: application/hal+json

{
    "_embedded": {
        "status": []
    },
    "_links": {
        "self": {
            "href": "http://localhost:8080/status"
        }
    },
    "page_count": 0,
    "page_size": 25,
    "total_items": 0
}
Let's try to add an item:
POST /status HTTP/1.1
Accept: application/json
Content-Type: application/json

{
    "message": "First post!",
    "user": "mwop"
}
Remember how we configured authentication and authorization? Well, we can now see that it works!
HTTP/1.1 403 Forbidden
Content-Type: application/problem+json

{
    "detail": "Forbidden",
    "status": 403,
    "title": "Forbidden",
    "type": "http://www.w3.org/Protocols/rfc2616/rfc2616-sec10.html"
}
Let's provide our credentials so this will work. If you use an HTTP client such as cURL or HTTPie,
or a REST client such as RESTClient or Postman, these will generally allow you to specify your
credentials, and then turn them into an Authorization header. What you will see below is that
header with a Basic token.
POST /status HTTP/1.1
Accept: application/json
Authorization: Basic bXdvcDptd29w
Content-Type: application/json

{
    "message": "First post!",
    "user": "mwop"
}
This is finally successful!
HTTP/1.1 201 Created
Content-Type: application/hal+json

{
    "_links": {
        "self": {
            "href": "http://localhost:8080/status/3c10c391-f56c-4d04-a889-bd1bd8f746f0"
        }
    },
    "id": "3c10c391-f56c-4d04-a889-bd1bd8f746f0",
    "message": "First post!",
    "timestamp": 1396709084,
    "user": "mwop"
}
Note: The identifiers will be unique per entity; what you see when you create a new status message will differ in the identifier.
Let's retrieve that status message; we can use the URI in the self relational link to get it:
GET /status/3c10c391-f56c-4d04-a889-bd1bd8f746f0 HTTP/1.1
Accept: application/json
HTTP/1.1 200 OK
Content-Type: application/hal+json

{
    "_links": {
        "self": {
            "href": "http://localhost:8080/status/3c10c391-f56c-4d04-a889-bd1bd8f746f0"
        }
    },
    "id": "3c10c391-f56c-4d04-a889-bd1bd8f746f0",
    "message": "First post!",
    "timestamp": 1396709084,
    "user": "mwop"
}
If we go back to our collection URI, /status, we actually have something in it!
GET /status HTTP/1.1
Accept: application/json
HTTP/1.1 200 OK
Content-Type: application/hal+json

{
    "_embedded": {
        "status": [
            {
                "_links": {
                    "self": {
                        "href": "http://localhost:8080/status/3c10c391-f56c-4d04-a889-bd1bd8f746f0"
                    }
                },
                "id": "3c10c391-f56c-4d04-a889-bd1bd8f746f0",
                "message": "First post!",
                "timestamp": 1396709084,
                "user": "mwop"
            }
        ]
    },
    "_links": {
        "first": {
            "href": "http://localhost:8080/status"
        },
        "last": {
            "href": "http://localhost:8080/status?page=1"
        },
        "self": {
            "href": "http://localhost:8080/status?page=1"
        }
    },
    "page_count": 1,
    "page_size": 25,
    "total_items": 1
}
Let's update the status; send a PATCH request to change the message:
PATCH /status/3c10c391-f56c-4d04-a889-bd1bd8f746f0 HTTP/1.1
Accept: application/json
Content-Type: application/json

{"message": "[Updated] First Post!"}
Oops! This method requires authentication, too!
HTTP/1.1 403 Forbidden
Content-Type: application/problem+json

{
    "detail": "Forbidden",
    "status": 403,
    "title": "Forbidden",
    "type": "http://www.w3.org/Protocols/rfc2616/rfc2616-sec10.html"
}
Send your credentials this time:
PATCH /status/3c10c391-f56c-4d04-a889-bd1bd8f746f0 HTTP/1.1
Accept: application/json
Authorization: Basic bXdvcDptd29w
Content-Type: application/json

{"message": "[Updated] First Post!"}
Success!
HTTP/1.1 200 OK
Content-Type: application/hal+json

{
    "_links": {
        "self": {
            "href": "http://localhost:8080/status/3c10c391-f56c-4d04-a889-bd1bd8f746f0"
        }
    },
    "id": "3c10c391-f56c-4d04-a889-bd1bd8f746f0",
    "message": "[Updated] First post!",
    "timestamp": 1396709724,
    "user": "mwop"
}
PUT operates similarly to PATCH, though it is typically used to provide a full replacement for
the entity. We won't demonstrate it right now.
However, let's try a DELETE request. Recall that it needs authorization, so let's go ahead and
send our credentials the first time.
DELETE /status/3c10c391-f56c-4d04-a889-bd1bd8f746f0 HTTP/1.1
Accept: application/json
Authorization: Basic bXdvcDptd29w
This results in:
HTTP/1.1 204 No Content
Let's look at the documentation.
Documentation
In the previous chapter and this one both, we created documentation. If you poked around in the Apigility Admin UI, you likely saw the documentation embedded in each service. However, you can also view documentation by itself.
In the top navigation is an item entitled "Documentation", click it.
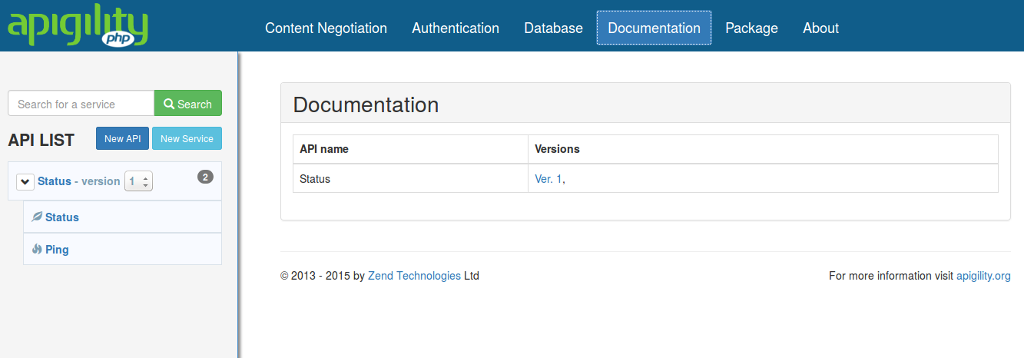
Just like APIs, documentation is versioned, and you can view documentation for each version separately. Click the "v1" link.
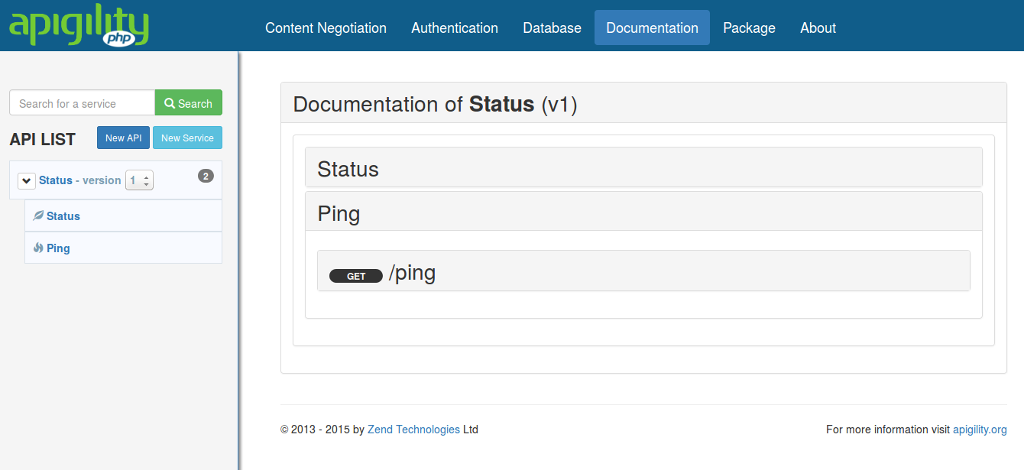
You can expand each service and see the operations. Expanding an operation shows you request and
response details for the operation, including allowed Accept and Content-Type request headers,
expected Content-Type response headers, expected response status codes, and more.
Summary
In the course of this chapter, we've covered:
- Creating a REST service.
- Creating filter and validators for service fields, including providing configuration for them.
- Documenting your service.
- Providing authentication and authorization for your service.
Apigility is a powerful and flexible tool for both defining your APIs, as well as exposing them, and provides a workflow from creation to providing documentation. You've scratched the surface -- now it's time to explore what you can build!